Email security is more important than ever in today’s digital age. With the rise of cyber threats like phishing, spoofing, and email fraud, protecting your email service is crucial. Cybercriminals often exploit vulnerabilities in email systems to steal sensitive information, spread malware, and impersonate trusted entities. Without proper security measures, your email domain can be misused, leading to significant financial and reputational damage.
DMARC, which stands for Domain-based Message Authentication, Reporting, and Conformance, is a key solution to these challenges. DMARC is an email authentication protocol designed to give email domain owners the ability to protect their domain from unauthorized use. By implementing DMARC, you can ensure that only legitimate emails are sent from your domain, effectively blocking phishing and spoofing attempts.
DMARC works by using two existing email authentication technologies: SPF (Sender Policy Framework) and DKIM (DomainKeys Identified Mail). It builds on these technologies by adding a reporting function that allows domain owners to monitor and understand how their email is being used and a policy function that tells email receivers how to handle emails that fail authentication checks.
In this guide, we will provide a comprehensive overview of DMARC, explain its importance in email security, and walk you through the steps to configure DMARC for your email service. By following these steps, you can protect your email domain, improve deliverability, and gain valuable insights into your email traffic.
What is DMARC?
DMARC (Domain-based Message Authentication, Reporting, and Conformance) is an email authentication protocol that allows domain owners to protect their email domain from unauthorized use, such as phishing and email spoofing. DMARC ensures that legitimate emails are properly authenticated using established standards and that fraudulent activity is reported to the domain owner.
How DMARC Works?
DMARC builds on two existing email authentication mechanisms: SPF (Sender Policy Framework) and DKIM (DomainKeys Identified Mail). Here’s a step-by-step breakdown of how DMARC works:
- SPF and DKIM Checks: When an email is sent, the receiving mail server checks if the email passes SPF and DKIM validation. SPF verifies that the email comes from an authorized server, while DKIM ensures that the email content has not been tampered with.
- Alignment Verification: DMARC requires that the domain in the SPF and DKIM checks align with the domain in the “From” header of the email. This alignment confirms that the email is legitimately from the claimed sender.
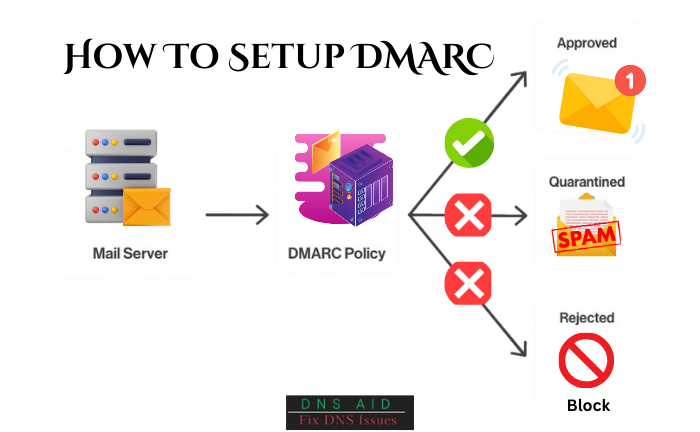
- DMARC Policy: The domain owner publishes a DMARC policy in their DNS records, specifying how receiving mail servers should handle emails that fail SPF or DKIM checks. Policies can be set to “none” (monitoring only), “quarantine” (mark as suspicious), or “reject” (block the email).
- Reporting: DMARC provides a reporting feature where receiving mail servers send aggregate and forensic reports to the domain owner. These reports offer insights into email traffic and any authentication issues, helping domain owners understand and improve their email security posture.
Benefits of Implementing DMARC
Implementing DMARC offers several significant benefits:
- Enhanced Email Security: DMARC protects your email domain from being misused by cybercriminals, reducing the risk of phishing, spoofing, and other fraudulent activities.
- Improved Email Deliverability: Emails that pass DMARC checks are more likely to be trusted by receiving mail servers, increasing the chances that your legitimate emails will reach their intended recipients.
- Brand Protection: By preventing unauthorized use of your domain, DMARC helps maintain your brand’s reputation and trustworthiness.
- Visibility and Insights: DMARC’s reporting feature provides valuable data on email traffic and authentication issues, allowing you to monitor and enhance your email security continuously.
- Compliance: DMARC helps ensure compliance with email security standards and regulations, which can be crucial for organizations in regulated industries.
The Components of DMARC
DMARC Policy (p=none, p=quarantine, p=reject)
The DMARC policy dictates how receiving mail servers should handle emails that fail DMARC authentication checks. There are three policy options:
- p=none: This policy is used for monitoring purposes only. Emails that fail DMARC checks are still delivered to the recipient, but the domain owner receives reports on these failures. It’s a good starting point for organizations to gather data without affecting email delivery.
- Quarantine: With this policy, emails that fail DMARC checks are marked as suspicious and are typically delivered to the recipient’s spam or junk folder. This helps reduce the chances of fraudulent emails being seen as legitimate by recipients.
- p=reject: This is the strictest policy, instructing receiving mail servers to outright reject emails that fail DMARC checks. These emails are not delivered at all, providing the highest level of protection against email spoofing and phishing.
DMARC Aggregate Reports (RUA)
DMARC aggregate reports, often referred to as RUA (Reporting URI for Aggregate Data), provide summarized data on email authentication results. These reports include information such as:
- Sender IP addresses: identifying the sources of emails sent using the domain.
- Pass/fail statistics: showing how many emails passed or failed DMARC, SPF, and DKIM checks.
- Alignment status: indicating whether the SPF and DKIM checks were aligned with the domain in the “From” header.
Aggregate reports help domain owners understand the overall email authentication landscape and identify any sources of authentication failures. They are typically sent in XML format to an email address specified in the DMARC record.
DMARC Forensic Reports (RUF)
DMARC forensic reports, also known as RUF (Reporting URI for Forensic Data), provide detailed information about individual emails that fail DMARC checks. These reports include:
- Email headers and body: providing details of the failed email, which can help in diagnosing the cause of the failure.
- Authentication results: showing the results of SPF, DKIM, and DMARC checks for the specific email.
- Failure reasons: explaining why the email failed the DMARC checks.
Forensic reports are sent immediately when a failure is detected and offer a deeper insight into specific issues, enabling quicker resolution of authentication problems. However, due to the sensitive nature of the data, it should be handled with care and sent to a secure, monitored email address.
Pre-requisites for DMARC Implementation
Setting up SPF (Sender Policy Framework)
SPF is an email authentication method that helps prevent spammers from sending emails on behalf of your domain. It works by allowing domain owners to specify which mail servers are permitted to send email on behalf of their domain.
- Create an SPF Record: An SPF record is a type of DNS record that lists the IP addresses authorized to send email from your domain.
- Example SPF record: v=spf1 include:_spf.google.com -all
- This record means that only Google’s mail servers are authorized to send emails on behalf of your domain.
- Publish the SPF Record in DNS: Add the SPF record to your domain’s DNS settings. This can usually be done through your domain registrar or DNS hosting provider’s control panel.
- Test the SPF Record: Use tools like MXToolbox or SPF record checkers to verify that your SPF record is correctly configured and functioning as intended.
Implementing DKIM (DomainKeys Identified Mail)
DKIM is an email authentication technique that allows the receiver to check that an email was indeed sent and authorized by the owner of that domain. It uses a digital signature, which is added to the email header and validated by the recipient’s mail server.
- Generate DKIM Keys: Create a pair of cryptographic keys (public and private). The private key is used to sign your emails, and the public key is published in your DNS records.
- Publish the Public Key in DNS: Add the public key to your domain’s DNS settings. This is usually done by creating a TXT record that contains the DKIM public key.
- Example DKIM record: v=DKIM1; k=rsa; p=MIIBIjANBgkqhkiG9w0BAQEFAAOCAQ8AMIIBCgKCAQEA7…
- Configure your email server to sign emails with DKIM: Set up your email server or email service provider to sign outgoing emails with your private DKIM key.
- Test DKIM Configuration: Use tools like DKIM validators to ensure that your DKIM signature is correctly implemented and that emails are being signed properly.
Ensuring DNS Records are Properly Configured
Properly configured DNS records are essential for DMARC, SPF, and DKIM to function effectively. Here’s how to ensure your DNS records are set up correctly:
- Check DNS Propagation: After adding or updating DNS records, it can take some time for changes to propagate across the internet. Use tools like DNS propagation checkers to verify that your records are correctly published.
- Verify Syntax: Ensure that the syntax of your DNS records is correct. Even a small error can cause authentication failures. Use DNS record validation tools to check for common mistakes.
- Monitor DNS Changes: Regularly review your DNS settings to ensure that no unauthorized changes have been made. Use DNS monitoring tools to receive alerts if any records are modified.
- Secure DNS Access: Limit access to your DNS settings to authorized personnel only. Implement two-factor authentication (2FA) and other security measures to prevent unauthorized access.
How To Setup DMARC: Step-by-Step Guide

Step 1: Evaluate and Prepare Your Email Environment
Before implementing DMARC, it’s essential to understand your current email environment and ensure all necessary components are in place.
- Inventory Email Sources: Identify all legitimate sources that send email on behalf of your domain. This includes your email servers, third-party services, and marketing platforms.
- Ensure SPF and DKIM Are Set Up: Make sure you have SPF and DKIM correctly configured for all identified email sources. This provides the foundation for DMARC.
- Review Current Email Authentication Status: Check your current email authentication status using tools like DMARC analyzers to see how your domain is performing without DMARC.
Step 2: Create a DMARC Record
A DMARC record is a DNS TXT record that specifies your DMARC policy. Here’s how to create it:
- Define Your DMARC Policy: Decide whether to start with a monitoring policy (p=none) or move straight to enforcement (p=quarantine or p=reject).
- Set Up Reporting Addresses: Specify email addresses for aggregate (RUA) and forensic (RUF) reports. Ensure these mailboxes are monitored regularly.
Example DMARC record: v=DMARC1; p=none; rua=mailto:dmarc-reports@yourdomain.com; ruf=mailto:dmarc-alerts@yourdomain.com; fo=1
Step 3: Publish the DMARC Record in Your DNS
After creating the DMARC record, publish it in your DNS settings:
- Access Your DNS Management Console: Log in to your domain registrar or DNS hosting provider.
- Add a New TXT Record: Create a new TXT record for your domain with the name _dmarc and the value containing your DMARC policy.
- Save and Verify: Save the changes and use tools like DMARC record checkers to verify that the record is published correctly.
Step 4: Monitor and Analyze DMARC Reports
Once your DMARC record is live, start monitoring the reports to understand how your emails are being authenticated.
- Collect Aggregate Reports (RUA): Aggregate reports provide an overview of your email traffic and authentication results. Analyze these reports to identify any issues with SPF or DKIM alignment.
- Review Forensic Reports (RUF): Forensic reports offer detailed information on individual emails that failed DMARC checks. Use these reports to diagnose specific problems.
- Adjust Policies and Records as Needed: Based on the insights from the reports, make necessary adjustments to your SPF, DKIM, and DMARC records to improve alignment and authentication.
Step 5: Gradually Enforce DMARC Policy
After monitoring and analyzing your reports, you can start enforcing stricter DMARC policies.
- Move to Quarantine (p=quarantine): Change your DMARC policy to p=quarantine to start marking failing emails as suspicious. Monitor the impact and adjust as needed.
Example record for quarantine: v=DMARC1; p=quarantine; rua=mailto:dmarc-reports@yourdomain.com; ruf=mailto:dmarc-alerts@yourdomain.com; fo=1
- Move to Reject (p=reject): Once you’re confident that your legitimate emails are passing authentication, change your DMARC policy to p=reject to block failing emails completely.
Example record for reject:
v=DMARC1; p=reject; rua=mailto:dmarc-reports@yourdomain.com; ruf=mailto:dmarc-alerts@yourdomain.com; fo=1
- Continue Monitoring and Adjusting: Even after enforcing a reject policy, continue to monitor DMARC reports and make adjustments as necessary to maintain strong email security.
Best Practices for DMARC Implementation
Start with a “None” Policy for Monitoring
Begin your DMARC implementation with a “none” policy (p=none). This allows you to monitor your email traffic without affecting email delivery.
- Gather Data: Collect data on how your emails are being authenticated and identify any issues with SPF and DKIM alignment.
- Understand Your Email Ecosystem: Use the monitoring period to understand all the sources sending emails on behalf of your domain.
Regularly Review and Analyze DMARC Reports
Consistent review and analysis of DMARC reports are crucial for identifying issues and improving your email security.
- Daily or Weekly Reviews: Set a regular schedule for reviewing DMARC aggregate and forensic reports.
- Identify Patterns: Look for patterns in authentication failures and investigate any anomalies.
- Adjust Policies: Make necessary adjustments to your SPF and DKIM configurations based on the insights gained from the reports.
Gradually Move to Stricter Policies (Quarantine, Then Reject)
After a period of monitoring and adjustments, start enforcing stricter DMARC policies to enhance security.
- Move to Quarantine: Change your policy to p=quarantine to mark emails that fail DMARC checks as spam or junk.
- Monitor Impact: Continue to monitor DMARC reports to ensure legitimate emails are not being mistakenly quarantined.
- Move to Reject: Once you are confident that all legitimate email sources are properly authenticated, update your policy to p=reject to block emails that fail DMARC checks completely.
- Ensure Compliance: Verify that all legitimate email sources comply with DMARC policies to avoid email delivery issues.
Keep your SPF and DKIM records updated
Regular updates to your SPF and DKIM records ensure that all legitimate email sources are correctly authenticated.
- Add New Sources Promptly: When you add new email services or servers, update your SPF and DKIM records immediately.
- Remove Obsolete Entries: Regularly clean up your SPF records to remove IP addresses or servers that no longer send emails for your domain.
- Check for Expiration: Ensure your DKIM keys are rotated regularly and are not expired.
Coordinate with third-party senders
Many organizations use third-party services to send emails on their behalf. It’s essential to ensure these services are compliant with your DMARC policy.
- Communicate DMARC requirements: Inform third-party senders about your DMARC policy and ensure they can pass SPF and DKIM checks.
- Monitor Third-Party Compliance: Use DMARC reports to verify that emails sent by third parties are correctly authenticated.
- Provide Support: Offer assistance to third-party senders in configuring SPF and DKIM to align with your domain.
Troubleshooting Common Issues
Misconfigured DNS Records
Misconfigured DNS records can prevent DMARC, SPF, and DKIM from working correctly, leading to authentication failures.
- Verify Syntax: Ensure that your DMARC, SPF, and DKIM records are correctly formatted. Even minor syntax errors can cause issues.
- Use DNS validation tools to check for common mistakes.
- Check DNS propagation: After updating DNS records, it can take some time for changes to propagate. Use DNS propagation tools to verify that your records are live.
- Ensure Proper Placement: Make sure your DNS records are placed in the correct DNS zone. For example, the DMARC record should be added as a TXT record with the name _dmarc.yourdomain.com.
Problems with SPF Alignment
SPF alignment issues occur when the domain in the SPF record does not match the domain in the “From” address of the email.
- Review the SPF Record: Ensure that your SPF record includes all authorized sending IP addresses and services.
- Example SPF record: v=spf1 include:_spf.google.com include:spf.protection.outlook.com -all
- Check Sending Sources: Verify that all email sources use the correct “From” domain that aligns with your SPF record.
- Use Subdomains: If emails are sent from subdomains, ensure they are included in your SPF record or have their own SPF records.
Issues with DKIM signatures
DKIM signature problems can arise if the DKIM keys are not correctly configured or if the signing process fails.
- Verify DKIM Key Setup: Ensure your DKIM public key is correctly published in your DNS.
- Example DKIM record: v=DKIM1; k=rsa; p=MIIBIjANBgkqhkiG9w0BAQEFAAOCAQ8AMIIBCgKCAQEA7…
- Check Signing Configuration: Make sure your email server or service is properly signing outgoing emails with the DKIM private key.
- Test DKIM Signatures: Use DKIM validation tools to check if the signatures on your emails are valid.
Handling false positives in DMARC reports
False positives occur when legitimate emails fail DMARC checks and are incorrectly marked as suspicious or rejected.
- Analyze Forensic Reports: Examine forensic reports to understand why legitimate emails are failing DMARC checks.
- Identify Common Issues: Look for patterns such as misalignment in SPF or DKIM and address these issues.
- Adjust Policies Gradually: When moving to stricter DMARC policies, do so gradually and monitor the impact to minimize false positives.
- Whitelist Trusted Sources: If certain trusted email sources are consistently failing, consider whitelisting them or adjusting their configurations to pass DMARC checks.
Conclusion
DMARC is a crucial component in enhancing your email security. By implementing DMARC, you can effectively protect your email domain from phishing, spoofing, and other cyber threats. This protocol builds on SPF and DKIM to provide a comprehensive email authentication framework, ensuring that only legitimate emails are delivered to your recipients.
The benefits of DMARC are substantial, including improved email deliverability, enhanced brand protection, and valuable insights into your email traffic. By following the steps outlined in this guide—evaluating your email environment, setting up SPF and DKIM, creating and publishing a DMARC record, monitoring reports, and gradually enforcing stricter policies—you can significantly bolster your email security.

